Do you need more room in your craft room? Are your shelves overflowing with supplies and it’s making it hard to find what you need and stay organized? If so, now is the time to take control of the chaos!
Having an organized craft room (or any space for that matter) isn’t something that happens overnight. It takes practice and effort on your part, but if done correctly it can make crafting much easier and enjoyable.
In this article, we’ll provide some tips for reorganizing and organizing your craft room so that you love spending time there again. We’ll also take a look at different storage options to help you make the best use of your space.
Assess the contents of your craft room and determine what to keep, sell, or donate
The first step when it comes to organizing your craft room and supplies is to assess the contents of your craft room and determine what you want to keep, sell, or donate. It’s important to do this before you start sorting!
Assess what supplies you have and make sure they are in good condition. Check if the glue still works, the paint has not dried out or the fabrics are in tiptop shape before donating them. That way you can ensure that whoever receives them will have a great crafting experience.
If something is unusable but it has some sentimental value, consider reconsidering whether it should be kept or not. Sentimental items may turn out to be more clutter than anything else so use your judgement here.
Finally, for items that you don’t need anymore, donate them rather than tossing them into the garbage as many crafting communities accept donated items for those who can’t afford to buy supplies themselves.
Use clear, stackable containers and drawers for easy access to supplies
Using clear containers and drawers is the best way to organize your craft supplies. When you know exactly where your materials are, it’s easier to find what you need quickly and get back to crafting!
Clear containers make the perfect storage solution for craft rooms because they let you easily see what’s inside. But make sure those clear containers are stackable too so you can maximize all that valuable vertical space in your craft room.
Plus, when drawers or boxes open up horizontally, it’s much harder to grasp smaller objects. It can also be frustrating reaching into a drawer trying to piece together some scissors and beads…both will inevitably fall out due to the disorganization.
Grab some clear, stackable organizers that keep your supplies upright. That way everything is easy to grab and put away, even during chaotic crafting sessions!
Store similar items together, such as fabric scraps with fabric or beads with jewelry-making supplies
Having an organized craft room makes it easier to find what you need without dumping out bins and drawers to locate it. To make them more manageable, start by grouping similar items together and labeling them.
For instance, store fabric scraps with other fabric supplies, beads and findings with jewelry-making supplies, paper crafting supplies like markers and stamps in one location, etc. That way you know exactly where to go when you’re looking for something specific.
This is a great habit that’s worth taking the time for so you don’t have to search through mountains of stuff every time you craft! And it doesn’t take long; just a few minutes can make a big difference in terms of how quickly you can get things done each time you sit down at your worktable.
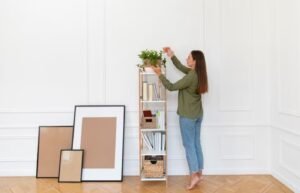
Use labeled shelves and bins to keep supplies organized by category or color
Labeled shelves and bins are absolutely essential when it comes to organizing your craft room. You can use them to separate supplies by category or color, making them easy and quick to find.
Shelving can also be used for your heavier items like glue guns and art sets, while smaller and lighter items like embroidery thread or beads can fit nicely in labeled containers.
Organizing according to categories and colors also makes it easy to tell exactly what you have in each bin, so you don’t buy duplicate items just because you can’t remember if you already had it. This way you’ll save time and money!
Labeling your supplies makes cleaning up a breeze after a crafting session. Just take out the supplies you need, then neatly put everything back in its place when you’re done (no more junk drawers)!
Use a pegboard or magnetic board for hanging tools and supplies
If you have a craft room, you need to organize it and make sure everything has its own place. That’s why I recommend investing in a pegboard or magnetic board.
These types of boards are great for tools and supplies that can easily be hung up and organized. You’ll save time because you won’t have to search tirelessly for the right tool or supply when you need it. Plus, these boards look really cute!
You can also buy magnetic organizers that hang off your board so all your paints, glues, coloring pens, etc are easy to access when you need them. If a pegboard isn’t an option for your craft room, then consider erecting shelves on the wall so that all of your crafts have their own designated space.
Store frequently used items within easy reach and infrequently used items on higher or lower shelves
Organizing your craft room and supplies is a great way to make crafting easier and more efficient. Keep frequently used items within easy reach by placing them on open shelves or nearby drawers.
This makes it simple to grab what you need while in the middle of a project, freeing up your time to get creative!
On the other hand, items that you don’t use often should be stored out of the way. You can place these supplies on higher shelves or in deeper drawers. This ensures that all your craft room space is maximized with efficiency in mind!
Shelving units and drawer systems are a great option for organizing any craft room because they allow for customization based on frequency of use. With this simple tip, you’ll have direct access to all your must-have supplies without clutter taking up too much valuable space!
Use a cutting mat, rulers, and rotary cutter to efficiently cut fabric
Cutting fabric can be difficult, time-consuming and require great precision. To make your life easier, invest in a cutting mat, rulers, quilting square and a rotary cutter.
Having these tools around your craft room will help you quickly measure, cut straight lines and cut complex shapes efficiently.
They’ll give you the accuracy and consistency that scissors won’t provide on their own. Plus, a rotary cutter is so much easier on the wrists! Investing in the right tools for the job will save you an incredible amount of time when it comes to cutting fabric.
You’ll be able to take measurements from our patterns faster than ever before, giving you the confidence to keep moving forward without having to worry about cutting mistakes.
Use a whiteboard or planner to keep track of projects and to-do lists
Using a whiteboard or planner can help keep your craft room and supplies organized. You can use it to keep track of projects, ideas and tasks that you need to do.
It’s also a great way to get inspired and motivated. Looking at a plain wall or empty page will give you the opportunity to fill it with helpful reminders and to-do lists that will help you stay focused on achieving your goals.
Plus, you’ll be able to look back on past projects that have been completed so that you can gain inspiration for new ones. Not only will this help remind you of what worked in the past, but it also may spark some new ideas that could lead to even more successes in the future!
Having a whiteboard or planner is also useful for creating supply lists for each project – so that’s one less thing you have to stress about when starting something new.
Store paper supplies, such as scrapbook paper and cardstock, in labeled file boxes or binders
Organizing craft-related paper supplies is a great way to maximize storage space. Storing these materials in labeled file boxes or binders can help ensure everything is easy to find and accessible.
Plus, labeled folders make it easy to categorize and store different items, such as scrapbooks, postcards, and other decorative objects. Keeping your paper supplies organized will help save time later on when you go searching for the item in need.
For larger items like rolls of scrapbook paper or cardstock, use cardboard packaging trays or 3-inch binders with multiple pockets to store larger pieces without folding them up into smaller pieces. This can help prevent any damage from folding them incorrectly or creasing them too much.
Consider using a cabinet with pull-out drawers or a rolling cart to maximize storage and increase mobility
Storage is key when it comes to organizing craft supplies and a cabinet with pull-out drawers or a rolling cart can help maximize your storage potential. Instead of randomly stacking boxes, bins, and bags on shelves or the floor, you can use compartmentalized drawers or sections of the cart to sort and store items in an orderly fashion.
The added bonus that both of these types of furniture provide is mobility so you can move things around your workspace as needed. You won’t be confined by the need to keep furniture stationary and instead can take your materials with you wherever you go! Plus, they’re both convenient for bringing crafts in progress out into living areas without leaving piles of supplies behind.
Final Words
Organizing your craft room and supplies can be an overwhelming task, but it doesn’t have to be.
With the right tips and tricks, you can design a special workspace that’s as beautiful and inviting as it is functional.
Craft organizing isn’t a one-time thing — it should be an ongoing process that allows you to make changes as life throws new obstacles in your way. Take the time to create a space you’ll love and get ready to enjoy crafting like never before!
By the way, if you’re a student then check out Harrington Housing they are offering the best student housing for those looking for a comfortable living space. Take the hassle out of finding furnished apartments, roommates, and moving furniture with their help.